
The Auxiliary Accounts screenشاشة الحسابات المساعدة
Clients, suppliers, employees, partners and banks are all created on one screen. They are one record type - the auxiliary account - and what a record is depends on the account you attach it to.
This guide is that screen, field by field. The guides for suppliers, clients, partners & employees and banks explain which accounts each party belongs on; they all point back here for the fields.
1. Open the screen
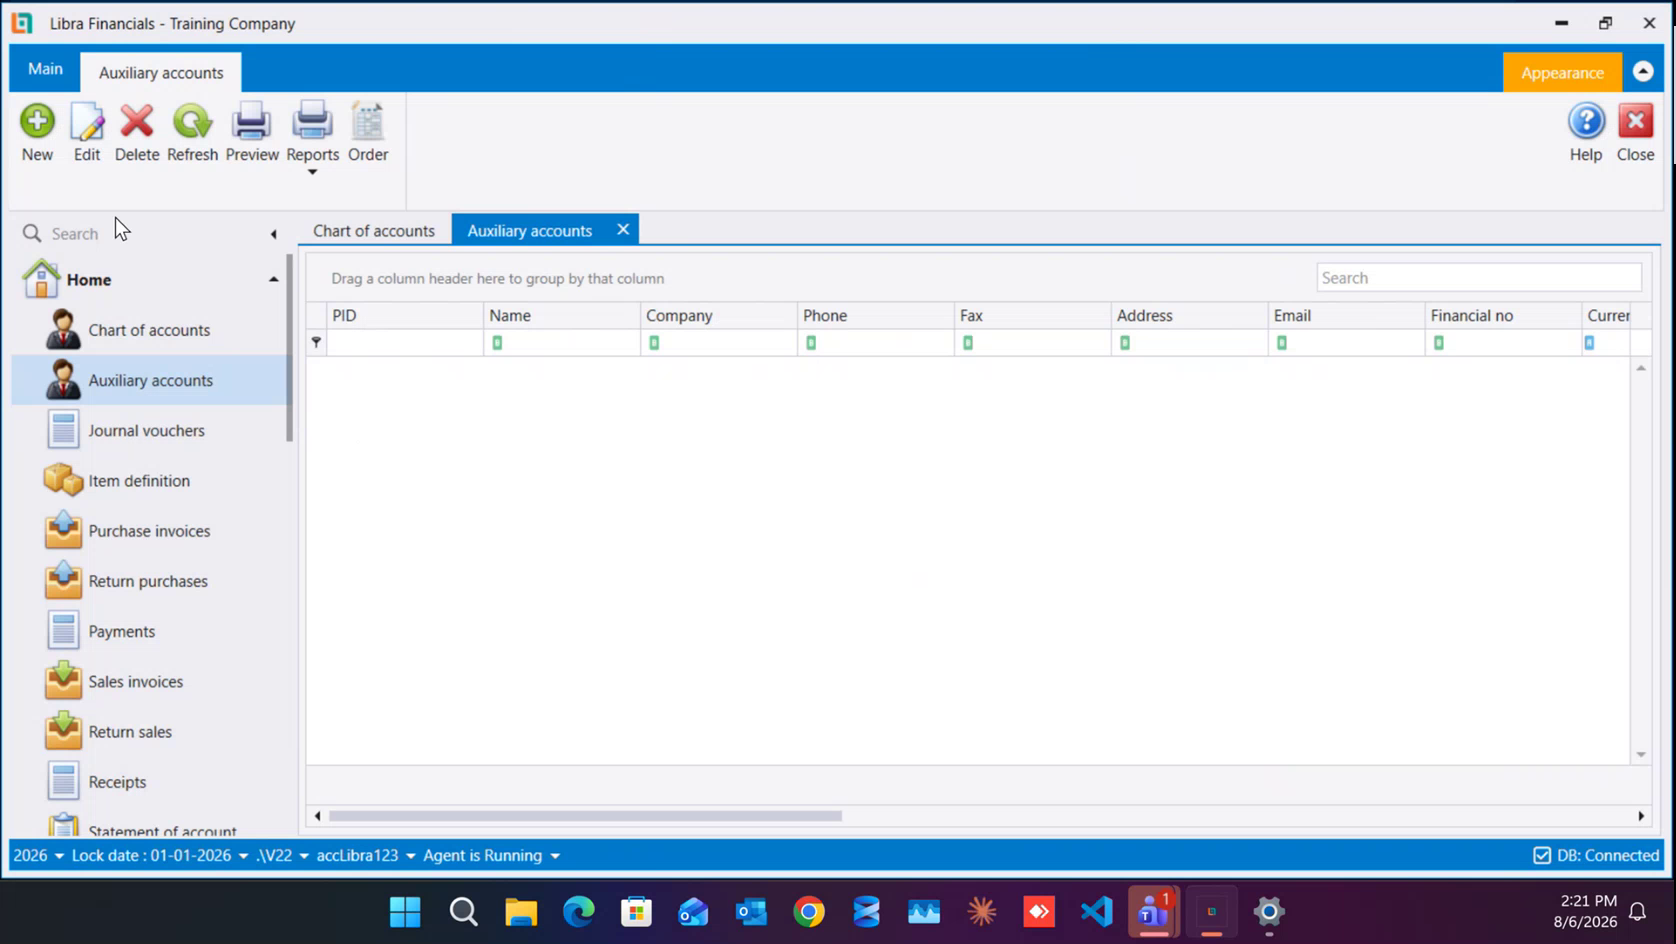
From the left menu, open Auxiliary accounts. It opens as its own tab and lists every party record you already have - PID, Name, Company, Phone, Fax, Address, Email, Financial no and the currency.
The ribbon above it is New · Edit · Delete · Refresh · Preview · Reports · Order. There is a search box at the top right of the grid, a filter row under the column headers, and a band above them: drag any column header onto it to group the list by that column.
2. New - and the three fields you must fill
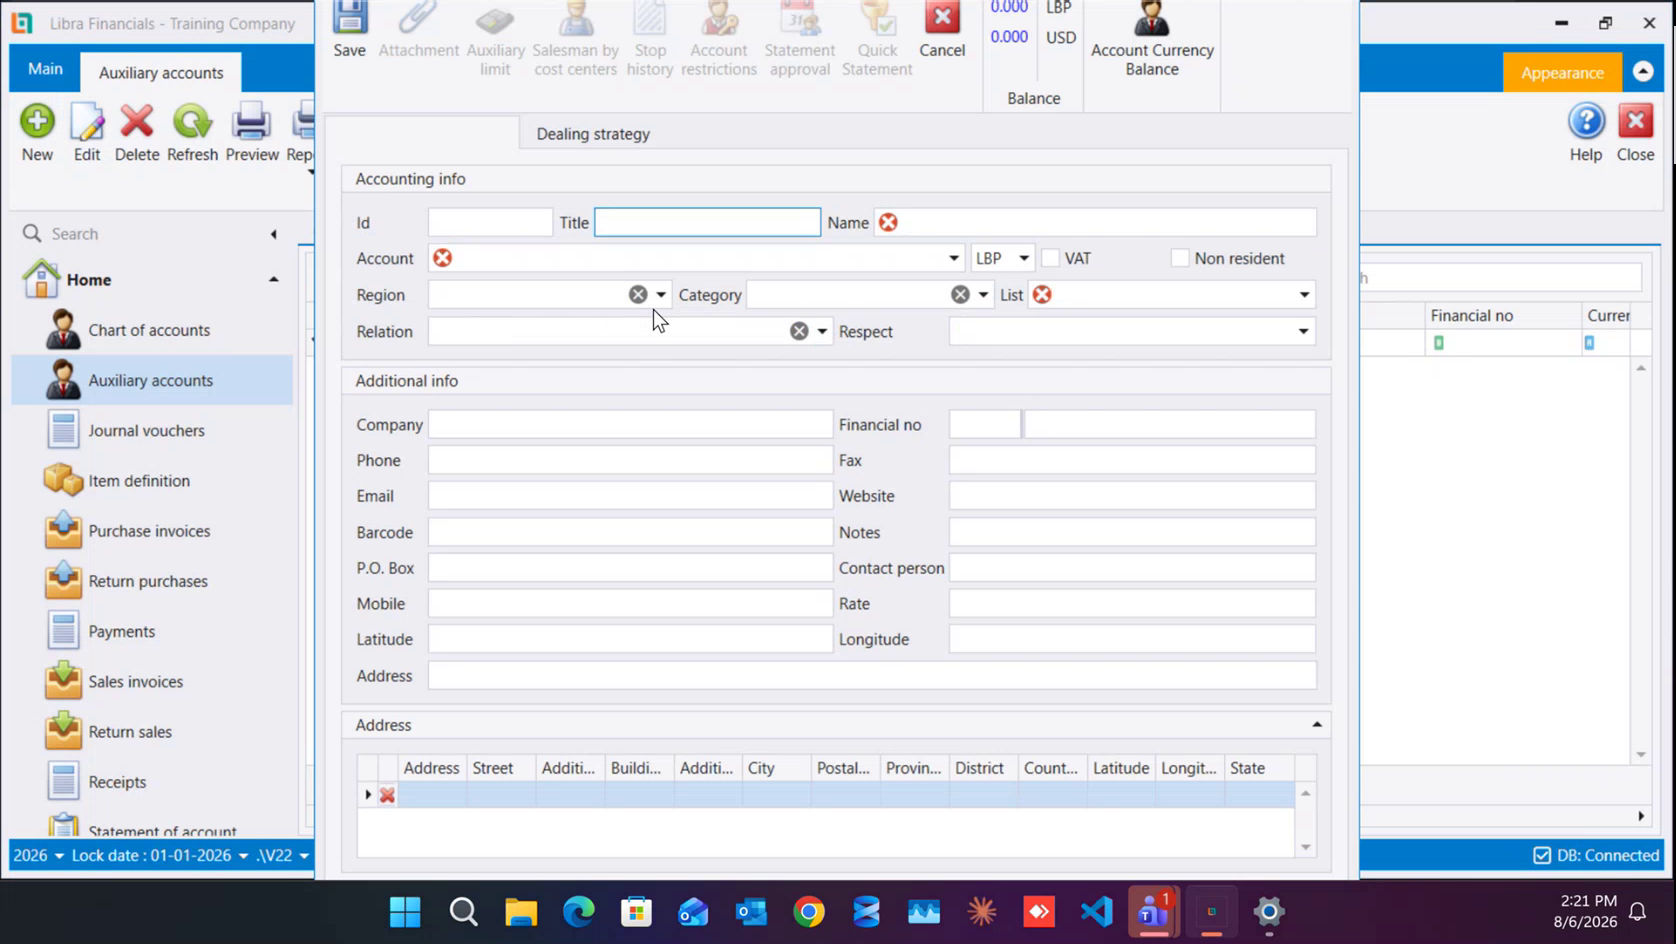
Click New. The editor opens with two tabs: the record's own name (blank until you type one) and Dealing strategy.
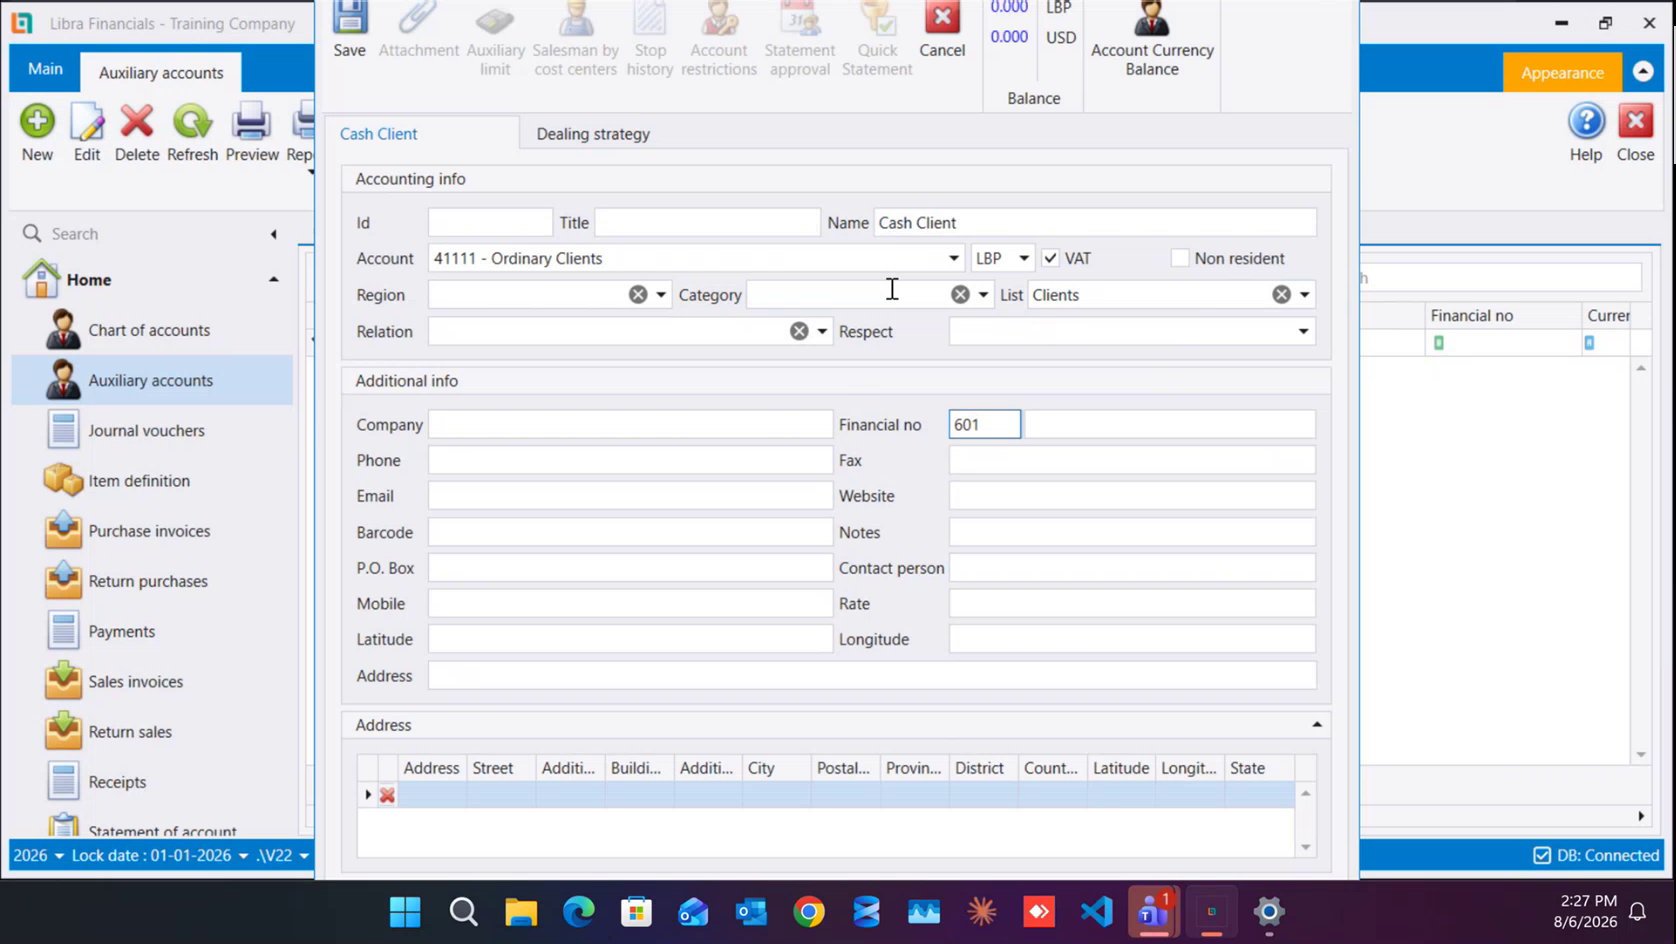
Three fields are flagged with a red marker and the record will not save without them:
- Name - what you will search by. Keep it short and recognisable (
Pepsi, not the full registered name - that goes in Company, below). - Account - the chart account the record posts to.
- List - which kind of party this is.
Id is not one of them: Libra assigns it for you when you save.
3. Pick the List before the Account
This is the step that saves the most time, and the one most people get backwards.
Choose List first. List says whether the record is a client, a supplier, an employee, a bank and so on - and it filters the Account dropdown down to the accounts that kind of party can sit on. With Clients chosen, the account list offers six accounts. With List left empty, it offers every auxiliary-enabled account in the whole chart, and you are hunting.
The Account dropdown also has its own search box at the top, so you can type instead of scroll.
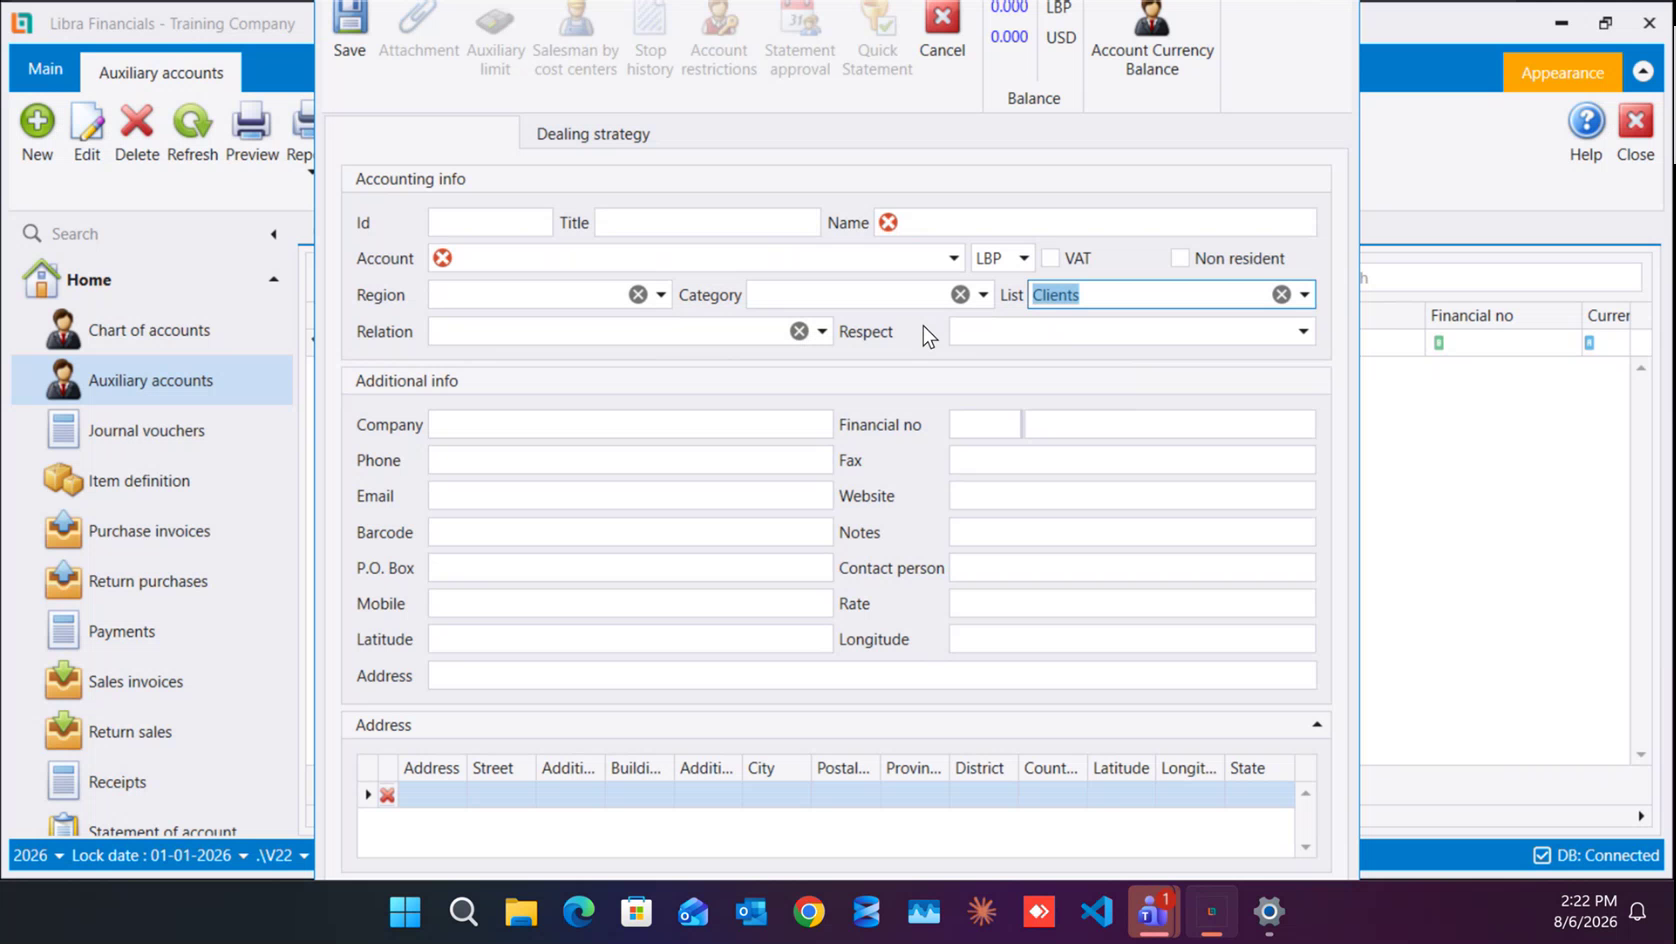
List locks the moment you save. It is greyed out from then on, so decide what the record is before you press Save.4. The rest of Accounting info
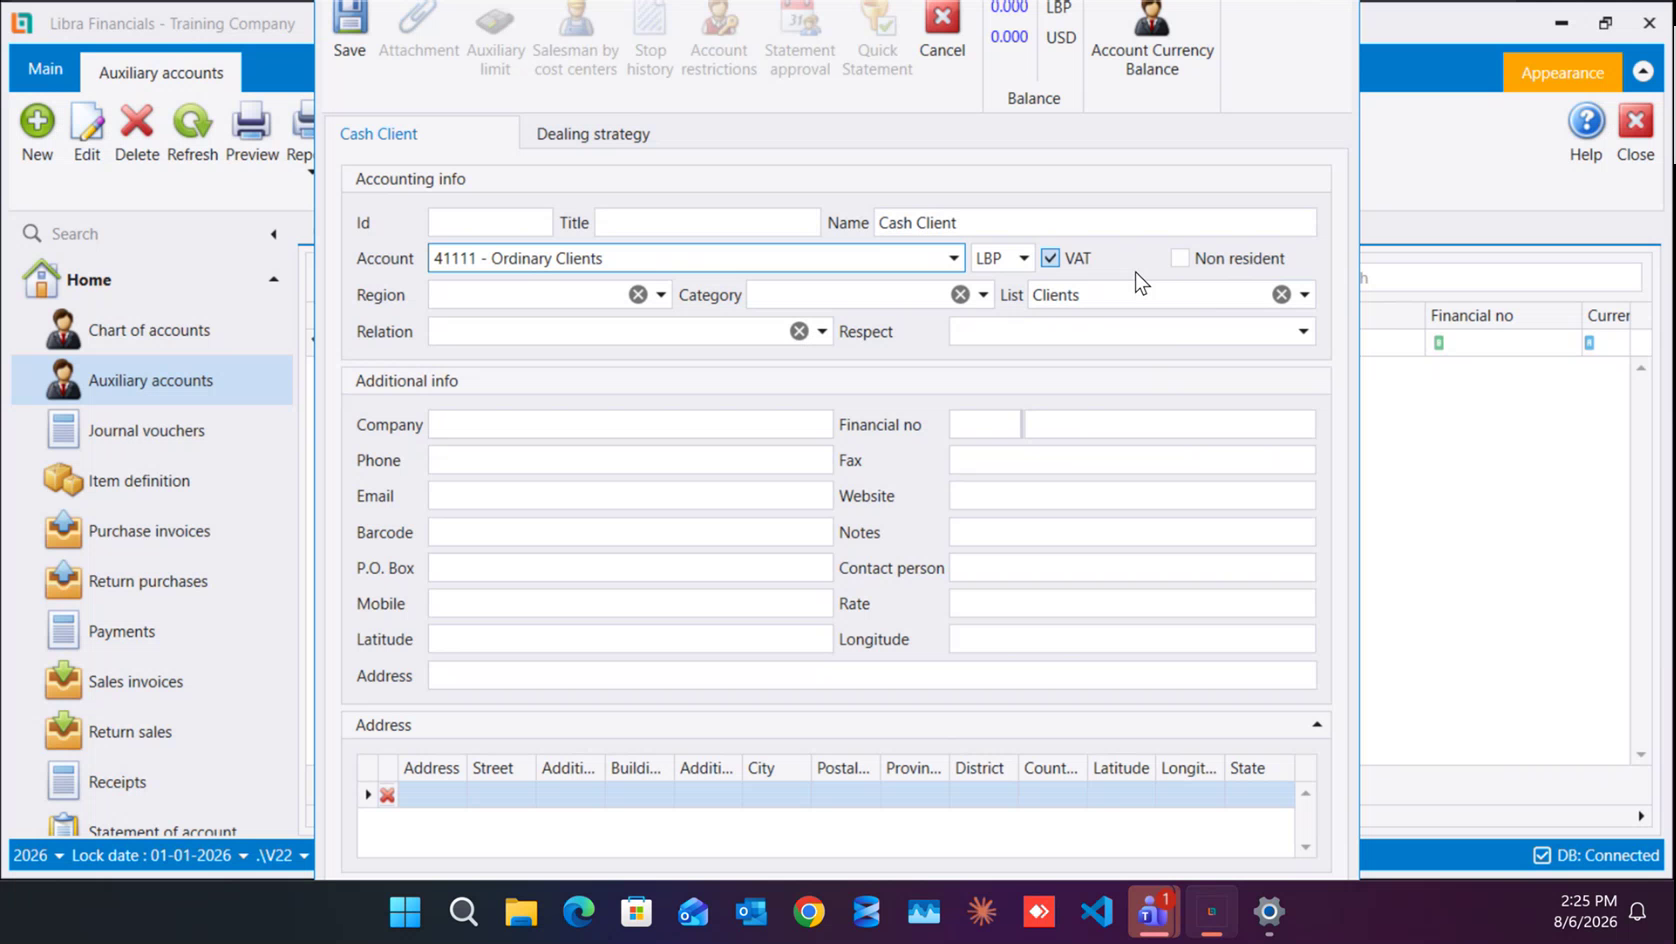
- Title - an optional courtesy title in front of the name.
- Currency - the unlabelled dropdown to the right of the account,
LBPorUSD. It follows the account you picked; if the account is locked to one currency, so is the record. - VAT - you do not normally tick this yourself. It arrives already ticked or already clear, because it comes from the account:
41111 Ordinary Clientsis a VAT account and41112 Clients Non VATis not, and picking one or the other is what sets this box. - Non resident - see the non-resident rule. Tick it for a foreign party, or for one with no fiscal number at all.
- Region and Category - two free filters. They are yours to define: fill them however your company wants to slice its parties, then filter and report on them.
- Relation and Respect - these belong to the salesman side of Libra. They record which salesman a party belongs to.
5. Additional info
Company is the one to get right. It is the party's official registered name, the one that sits on its financial number - and it is what the top-10 clients and top-10 suppliers reports print. So Name above can be Pepsi, the name you type all day, while Company carries the full registered name. Leave Company blank and those reports come out with an empty column.
Financial no is two boxes, and which box you use matters:
- the small box takes the prefix -
601,604or605- and only when the party is registered for VAT; - the large box takes the financial number itself.
A party with no number at all is a party you mark Non resident.
Rate is a per-party exchange rate. Set it and every invoice for that party comes up at that rate automatically, which is how you handle a customer you have agreed a different rate with.
Phone, Fax, Email, Website, Barcode, Notes, P.O. Box, Contact person and Mobile are ordinary contact fields. Latitude and Longitude are the party's map position; they can be filled in for you by the salesman app rather than typed.
6. Addresses
Address, at the bottom of Additional info, is the default address - the one that prints on the invoice.
Under it sits the Address grid, and it takes as many rows as you like: Address, Street, two Additional columns, Building, City, Postal, Province, District, Country, Latitude, Longitude, State. Every delivery point a customer has can go in here, and when you write an invoice you pick which one the goods go to.
7. Save
Save is at the top left of the form, Cancel beside it discards. Three things happen on save:
| What | What changes |
|---|---|
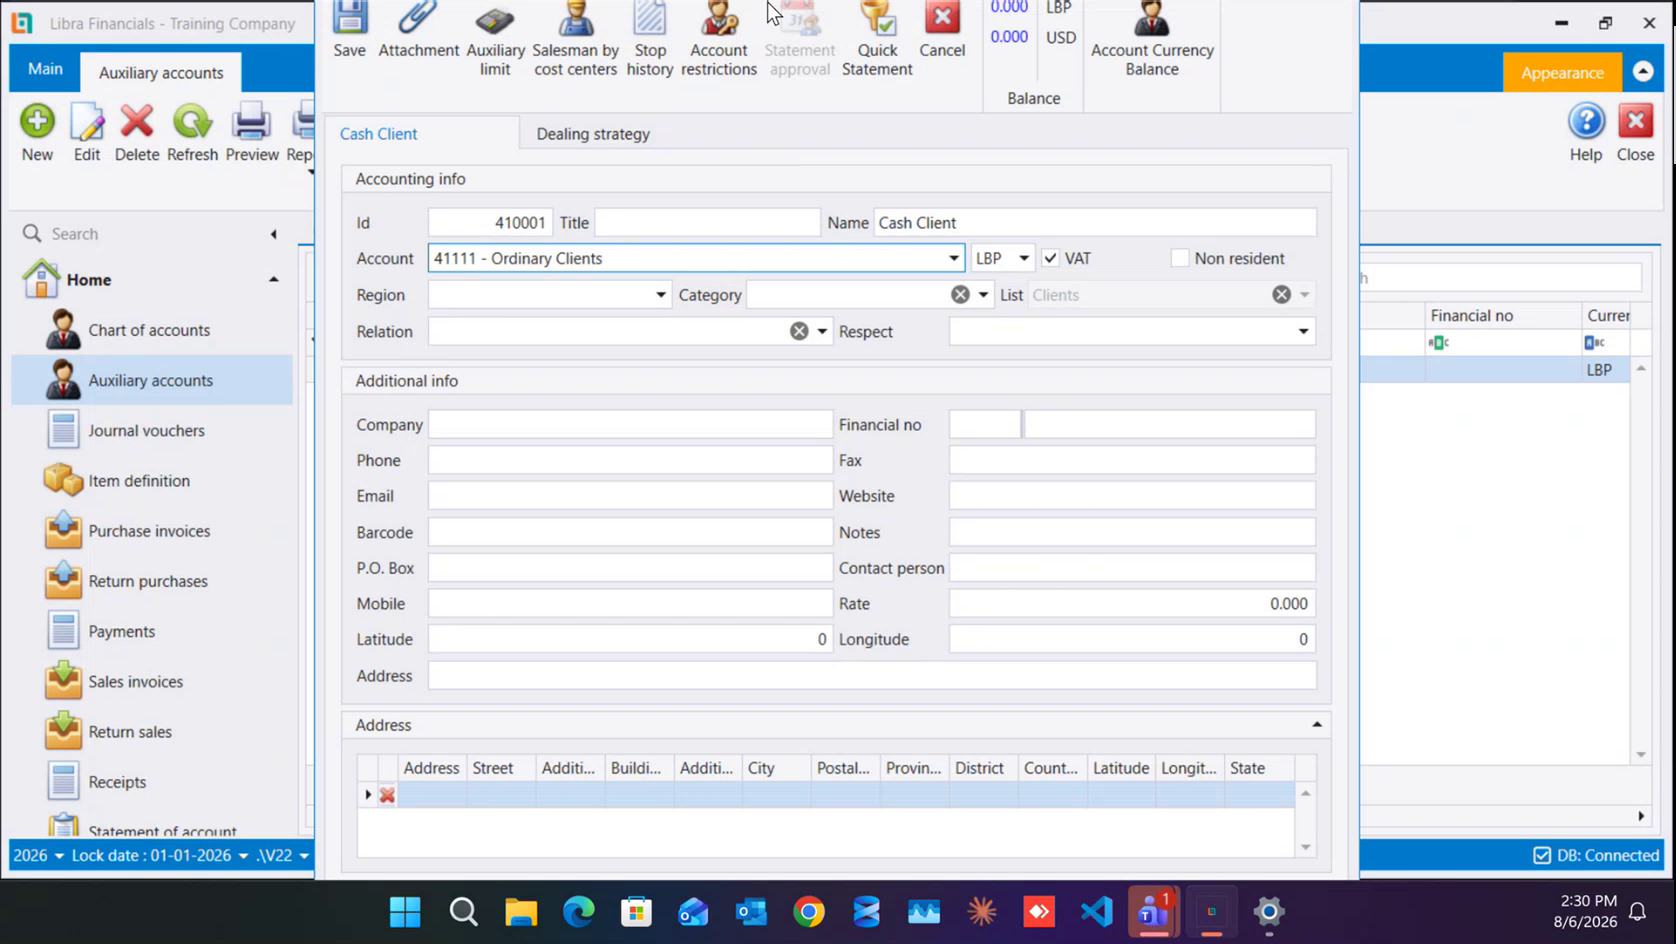
| Id | filled in for you, grouped by family - supplier records start at 400001, client records at 410001, employees at 420001, banks at 510001, and a fixed asset's own record at 220001 |
| List | greys out; the record's kind is fixed from here on |
| The toolbar | the buttons that were greyed out come to life |
That last family is not one you fill in by hand: saving a fixed asset's own card creates its auxiliary record here automatically, and that record is what carries the asset on a voucher line.
8. Attachments
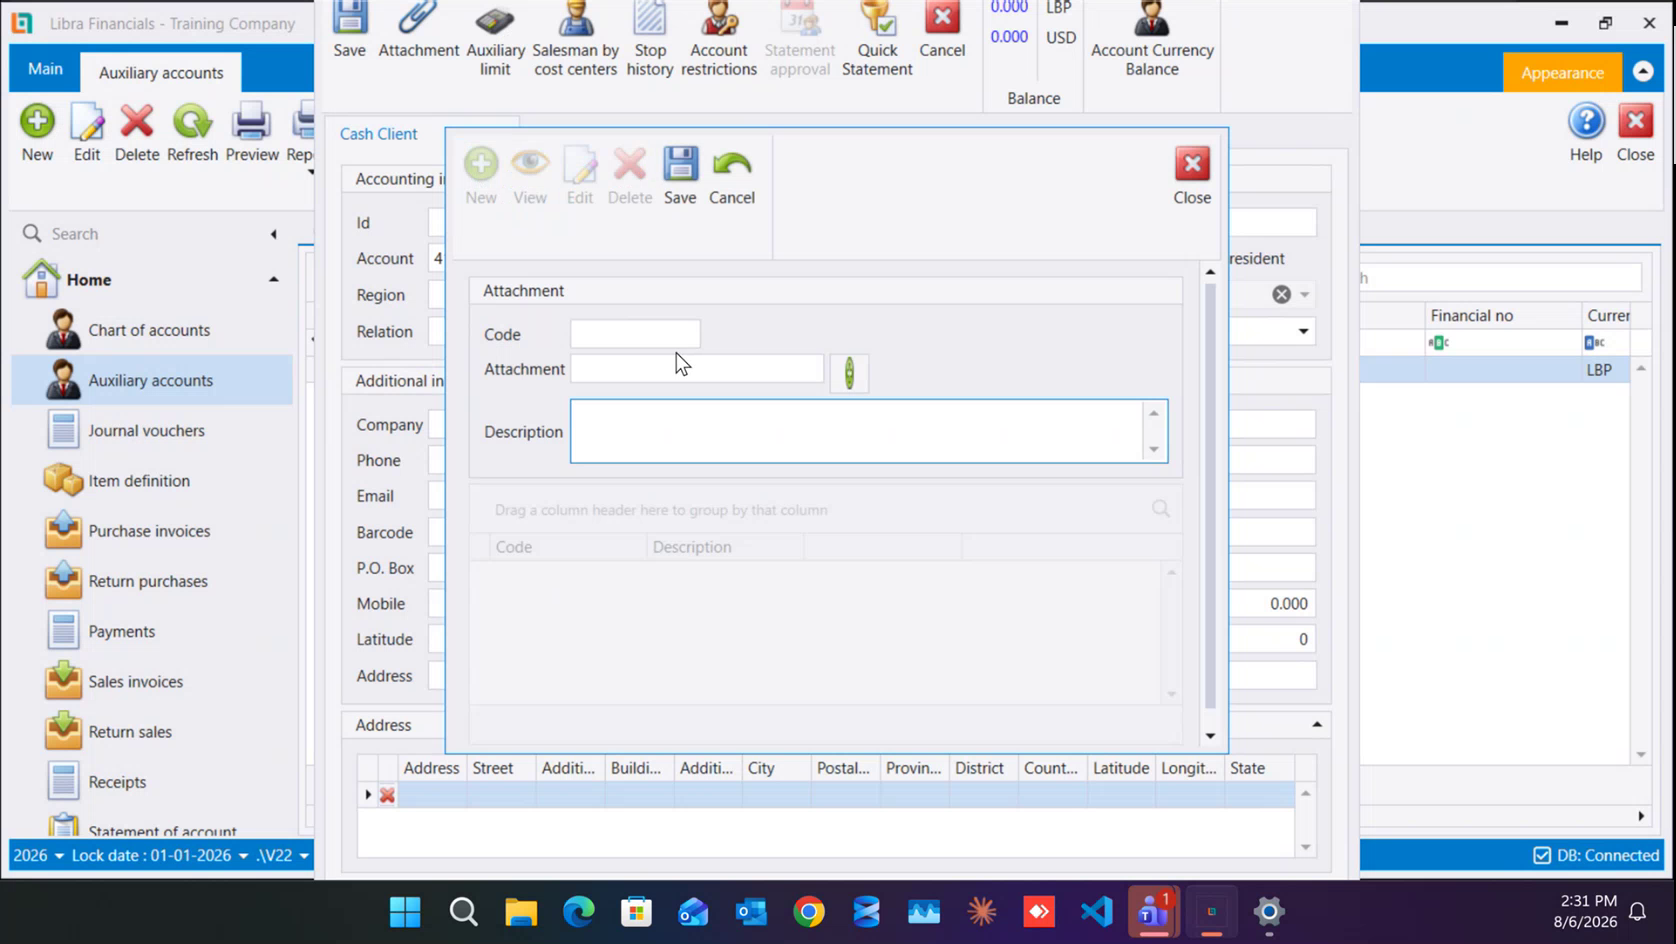
Attachment, in the toolbar, is the one of those buttons worth knowing straight away. It turns the party record into a small archive: attach the trade licence, the VAT certificate, a signed contract, anything.
Inside the dialog you get New · View · Edit · Delete · Save · Cancel · Close, and each attachment carries a Code, the Attachment itself (the button beside the box opens a file browser) and a Description. Attached files are listed below. The file does not have to sit on your own machine - a shared network folder works - and any file type is accepted. View opens the selected one; Delete removes it.
9. Account restrictions - pinning a record to one currency
Account restrictions, also in the toolbar, holds a small grid of Account + Currency pairs. Add a pair and this record can only be posted on that account in that currency; anything else is refused at entry.
That is how a bank account gets locked to one currency - the record for a bank's LBP account carries 5121 Bank Local + LBP, so a dollar can never land on it by accident. See Banks for the worked example.
It works on a saved record only. You cannot set a restriction while still creating the record - save first, reopen, then restrict. The dialog shows the Auxiliary account it belongs to at the top, so there is no doubt which record you are pinning.
10. The rest of the toolbar
The other buttons - Auxiliary limit, Salesman by cost centers, Stop history, Statement approval, Quick Statement, Account Currency Balance - and the Dealing strategy tab are all covered later in the training, not here. What is worth knowing now:
- they are disabled until the record is saved, so a blank new record shows them greyed;
- Statement approval stays disabled even after saving;
- the Balance readout between them shows the record's live balance in
LBPandUSDat once.
Next: Suppliers · Clients · Partners & employees · Banks.
يُنشأ الزبائن والموردون والموظفون والشركاء والمصارف كلهم في شاشة واحدة. فهم نوع سجل واحد هو الحساب المساعد (Auxiliary account)، وما يكونه السجل يحدده الحساب الذي تربطه به.
وهذا الدليل هو تلك الشاشة، حقلًا حقلًا. أما أدلة الموردين والزبائن والشركاء والموظفين والمصارف فتشرح الحسابات التي يجلس عليها كل طرف، وكلها تحيل إلى هنا في شرح الحقول.
1. افتح الشاشة
من القائمة اليسرى افتح الحسابات المساعدة (Auxiliary accounts). تُفتح في تبويب خاص بها وتعرض كل سجلات الأطراف الموجودة: PID والاسم (Name) والشركة (Company) والهاتف (Phone) والفاكس (Fax) والعنوان (Address) والبريد (Email) والرقم المالي (Financial no) والعملة.
والشريط أعلاها هو جديد (New) · تعديل (Edit) · حذف (Delete) · تحديث (Refresh) · معاينة (Preview) · تقارير (Reports) · ترتيب (Order). وفي أعلى يمين الجدول مربع بحث، وتحت عناوين الأعمدة صفّ تصفية، وفوقها شريط: اسحب أي عنوان عمود إليه ليتجمّع الجدول حسبه.
2. جديد - والحقول الثلاثة الإلزامية
اضغط جديد (New). يُفتح المحرّر بتبويبين: اسم السجل نفسه (فارغ حتى تكتب اسمًا) واستراتيجية التعامل (Dealing strategy).
وثلاثة حقول تحمل علامة حمراء ولن يُحفظ السجل بدونها:
- الاسم (Name) - ما ستبحث به. اجعله قصيرًا مميّزًا (
Pepsiلا الاسم المسجّل الكامل، فذاك مكانه حقل الشركة (Company) أدناه). - الحساب (Account) - حساب الشجرة الذي يُرحَّل عليه السجل.
- القائمة (List) - أي نوع من الأطراف هذا السجل.
أما المعرّف (Id) فليس منها: يضعه ليبرا بنفسه عند الحفظ.
3. اختر القائمة قبل الحساب
هذه الخطوة توفّر أكبر وقت، وهي التي يعكسها أكثر الناس.
اختر القائمة (List) أولًا. فهي تحدد أهذا السجل زبون أم مورد أم موظف أم مصرف… - وتُصفّي قائمة الحساب (Account) لتقتصر على الحسابات التي يجوز لذلك النوع الجلوس عليها. فمع اختيار الزبائن (Clients) تعرض قائمة الحسابات ستة حسابات فقط. وإن تركت List فارغة عرضت لك كل حساب مساعد في الشجرة كلها، وصرت تبحث.
كما أن لقائمة الحساب مربع بحث خاصًا بها في أعلاها، فيمكنك الكتابة بدل التمرير.
تُقفل القائمة (List) لحظة الحفظ. فتصير معطّلة من بعدها، فاحسم نوع السجل قبل أن تضغط حفظ.4. بقية معلومات المحاسبة (Accounting info)
- اللقب (Title) - لقب اختياري يسبق الاسم.
- العملة (Currency) - القائمة غير المسمّاة إلى يمين الحساب،
LBPأوUSD. وهي تتبع الحساب الذي اخترته؛ فإن كان الحساب مقفلًا على عملة واحدة قُفل السجل عليها كذلك. - الضريبة (VAT) - لا تضع هذه العلامة بنفسك عادةً. فهي تأتي موضوعة أو مرفوعة أصلًا لأنها من الحساب: فحساب
41111 Ordinary Clientsخاضع للضريبة و41112 Clients Non VATغير خاضع، واختيار أحدهما هو ما يضبط هذا المربع. - غير مقيم (Non resident) - راجع قاعدة غير المقيم. ضع العلامة للطرف الأجنبي، أو لمن لا رقم مالي له إطلاقًا.
- المنطقة (Region) والفئة (Category) - مرشّحان حرّان، تعرّفهما أنت: املأهما بالطريقة التي تريد شركتك تقسيم أطرافها بها، ثم صفِّ وتقرير عليهما.
- العلاقة (Relation) وRespect - يخصّان جانب المندوبين في ليبرا، ويسجلان المندوب التابع له الطرف.
5. معلومات إضافية (Additional info)
الشركة (Company) هو الحقل الذي يجب ضبطه. فهو الاسم الرسمي المسجَّل للطرف، الاسم الذي يحمل رقمه المالي - وهو ما تطبعه تقارير أكبر 10 زبائن وأكبر 10 موردين. فيمكن أن يكون الاسم (Name) أعلاه Pepsi، الاسم الذي تكتبه طوال النهار، بينما يحمل Company الاسم المسجَّل الكامل. وإن تركت Company فارغًا خرجت تلك التقارير بعمود فارغ.
والرقم المالي (Financial no) خانتان، والفرق بينهما مهم:
- الخانة الصغيرة للبادئة -
601أو604أو605- وفقط إن كان الطرف مسجلًا بالضريبة؛ - والخانة الكبيرة للرقم المالي نفسه.
ومن لا رقم له إطلاقًا هو من تضع له علامة غير مقيم (Non resident).
والسعر (Rate) سعر صرف خاص بالطرف. اضبطه فتأتي كل فاتورة لذلك الطرف بذلك السعر تلقائيًا، وهكذا تعالج زبونًا اتفقت معه على سعر مختلف.
أما الهاتف (Phone) والفاكس (Fax) والبريد (Email) والموقع (Website) والباركود (Barcode) والملاحظات (Notes) وصندوق البريد (P.O. Box) والشخص المسؤول (Contact person) والخلوي (Mobile) فحقول اتصال عادية. وخط العرض (Latitude) وخط الطول (Longitude) موقع الطرف على الخريطة، ويمكن أن يملأهما لك تطبيق المندوبين بدل كتابتهما.
6. العناوين
العنوان (Address) في أسفل Additional info هو العنوان الافتراضي - الذي يُطبع على الفاتورة.
وتحته جدول العناوين (Address)، ويقبل ما شئت من الصفوف: Address وStreet وعمودا Additional وBuilding وCity وPostal وProvince وDistrict وCountry وLatitude وLongitude وState. فكل نقطة تسليم لدى الزبون يمكن أن توضع هنا، وعند كتابة الفاتورة تختار إلى أيها تذهب البضاعة.
7. احفظ
زر حفظ (Save) في أعلى يسار النموذج، وإلغاء (Cancel) بجانبه يهمل التغييرات. وثلاثة أمور تحدث عند الحفظ:
| ماذا | ما الذي يتغيّر |
|---|---|
| المعرّف (Id) | يُملأ تلقائيًا ومجمَّعًا حسب العائلة - فسجلات الموردين تبدأ من 400001، والزبائن من 410001، والموظفين من 420001، والمصارف من 510001، وسجل الأصل الثابت نفسه من 220001 |
| القائمة (List) | تصير معطّلة، ونوع السجل يثبت من هنا فصاعدًا |
| الشريط | تعمل الأزرار التي كانت معطّلة |
وهذه العائلة الأخيرة ليست مما تملؤه بنفسك: فحفظ بطاقة الأصل الثابت نفسها ينشئ سجلها المساعد هنا تلقائيًا، وهذا السجل هو ما يحمل الأصل على سطر القيد.
8. المرفقات
المرفق (Attachment) في الشريط هو أول تلك الأزرار الجدير بالمعرفة. فهو يحوّل سجل الطرف إلى أرشيف صغير: أرفق السجل التجاري، وشهادة الضريبة، وعقدًا موقّعًا، وما شئت.
وداخل النافذة تجد جديد (New) · عرض (View) · تعديل (Edit) · حذف (Delete) · حفظ (Save) · إلغاء (Cancel) · إغلاق (Close)، ولكل مرفق رمز (Code) والملف (Attachment) نفسه (والزر بجانب الخانة يفتح مستعرض الملفات) ووصف (Description). وتُعرض الملفات المرفقة أسفلها. ولا يلزم أن يكون الملف على جهازك: مجلد مشترك على الشبكة يفي بالغرض، وأي نوع ملف مقبول. وView يفتح المحدَّد، وDelete يحذفه.
9. قيود الحساب - تثبيت السجل على عملة واحدة
قيود الحساب (Account restrictions)، وهو أيضًا في الشريط، يحوي جدولًا صغيرًا من أزواج الحساب (Account) والعملة (Currency). أضف زوجًا فلا يعود يُرحَّل هذا السجل إلا على ذلك الحساب بتلك العملة؛ وما عداه يُرفض عند الإدخال.
وهكذا يُقفل الحساب المصرفي على عملة واحدة - فسجل الحساب الليري لدى مصرف يحمل 5121 Bank Local مع LBP، فلا يقع عليه دولار سهوًا أبدًا. راجع المصارف للمثال المطبَّق.
ولا يعمل إلا على سجل محفوظ. فلا يمكنك وضع قيد وأنت ما تزال تنشئ السجل - احفظ أولًا، ثم أعد الفتح، ثم قيّد. وتعرض النافذة الحساب المساعد (Auxiliary account) الذي تخصّه في أعلاها، فلا شكّ في أيّ سجل تثبّته.
10. بقية الشريط
أما بقية الأزرار - حدّ المساعد (Auxiliary limit) والمندوب حسب مراكز التكلفة (Salesman by cost centers) وتاريخ الإيقاف (Stop history) واعتماد كشف الحساب (Statement approval) وكشف سريع (Quick Statement) ورصيد الحساب بالعملات (Account Currency Balance) - وتبويب استراتيجية التعامل (Dealing strategy) فتُشرح لاحقًا في التدريب لا هنا. والجدير بالمعرفة الآن:
- أنها معطّلة حتى يُحفظ السجل، فالسجل الجديد الفارغ يعرضها باهتة؛
- وأن Statement approval يبقى معطّلًا حتى بعد الحفظ؛
- وأن خانة الرصيد (Balance) بينها تعرض رصيد السجل الحيّ بالليرة
LBPوالدولارUSDمعًا.
التالي: الموردون · الزبائن · الشركاء والموظفون · المصارف.